docker-learning-getStarted

本篇的主要内容是:介绍Docker使用的基础知识。

概述

在上一章节中,已经安装好了Docker,在本篇中就要开始学习Docker的基本操作了。在本篇分为以下6部分来学习。

主要内容

Orientation

官方链接:https://docs.docker.com/get-started/

Docker是为开发人员或系统管理员提供的,可以开发,部署,运行应用程序的容器平台。这种在linux下使用容器来部署应用的方式,被称作集装箱化,意思就是把应用当做货轮上的一个一个的集装箱,而linux就相当于货轮。容器技术不是新出现的技术,但是它的确是一种便于部署应用的一个很好的方式。

NOTE : Containerization被翻译为集装箱化,听起来太难听了。接下来的文章中,我就直接叫它容器化了。

容器化之所以越来越受欢迎的原因是,采用这种方式有以下几个优点:

  • 灵活性:任何甚至最复杂的应用都可以采用该方案
  • 轻量级:容器充分利用和共享主机内核
  • 可替换:可以在应用运行过程中,部署和升级
  • 可移植:可以在本地构建,然后上传部署到云上,之后可以随处运行
  • 伸缩性:可以增加和自动分发容器副本
  • 堆栈:在运行中可以垂直堆叠服务

Images and containers

镜像和容器。通过运行一个镜像来启动一个容器。
一个镜像就是一个可运行的包,这个package包括了这个应用可运行的一切要素,例如应用源码、环境变量、运行时间、依赖、配置文件等。
一个容器就是内存中,被启动的镜像的一个运行时实例。可以用docker ps 来查看当前系统中正在运行中的容器

Containers and virtual machines

容器和虚拟机。在本地linux下运行的一个容器和其他的容器共享主机内核,它是不会长期的占用系统资源,比其他可执行的应用占用更小的内存,更轻量级。

在虚拟机下,相比于使用访客用户来独立部署应用,Docker使用容器方式部署应用要占用更少的系统资源。
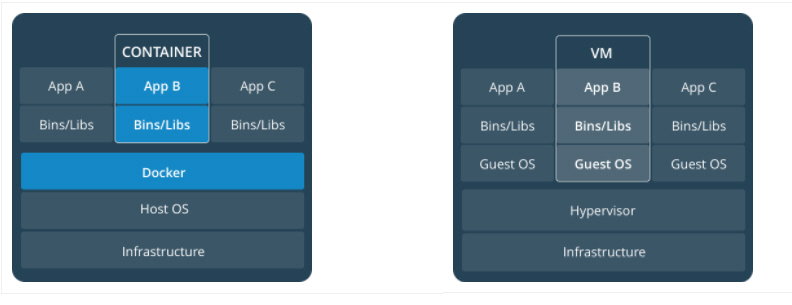
简单命令

查看当前系统安装的Docker版本

1
2
3
4
5
6
7
8
9
10
11
12
13
14
15
16
17
18
19
20
21
22
23
[root@VM_0_3_centos ~]# docker -v
Docker version 18.03.0-ce, build 0520e24
[root@VM_0_3_centos ~]# docker version
Client:
Version: 18.03.0-ce
API version: 1.37
Go version: go1.9.4
Git commit: 0520e24
Built: Wed Mar 21 23:09:15 2018
OS/Arch: linux/amd64
Experimental: false
Orchestrator: swarm

Server:
Engine:
Version: 18.03.0-ce
API version: 1.37 (minimum version 1.12)
Go version: go1.9.4
Git commit: 0520e24
Built: Wed Mar 21 23:13:03 2018
OS/Arch: linux/amd64
Experimental: false
[root@VM_0_3_centos ~]#

查看当前系统下的镜像

1
2
3
4
[root@VM_0_3_centos ~]# docker images
REPOSITORY TAG IMAGE ID CREATED SIZE
hello-world latest f2a91732366c 4 months ago 1.85kB
[root@VM_0_3_centos ~]#

查看当前系统下正在运行容器

1
2
3
[root@VM_0_3_centos ~]# docker ps
CONTAINER ID IMAGE COMMAND CREATED STATUS PORTS NAMES
[root@VM_0_3_centos ~]#

查看当前系统下全部的容器

1
2
3
4
[root@VM_0_3_centos ~]# docker ps -a
CONTAINER ID IMAGE COMMAND CREATED STATUS PORTS NAMES
7570316825e8 hello-world "/hello" 19 hours ago Exited (0) 19 hours ago relaxed_pasteur
[root@VM_0_3_centos ~]#

Conclusion orientation

容器化可以使应用做到无缝的持续集成、持续部署,例如:

  • 应用间没有依赖
  • 可以将应用更新推送到任意其他的分支应用
  • 可以优化资源配比

使用Docker,要做到可弹性化的应用只需要一个配置文件即可,而不需要再运行笨重的虚拟机。

Containers

官方链接:https://docs.docker.com/get-started/

在以前,如果我们需要开始写一个Python App时,首先需要做的,是在自己的机器上,搭建Python的运行环境,这样就需要我们必须安装正确合理的运行环境,并且要和生成还款一致。
现在,使用Docker,只需要获取一个便捷的Python运行时的镜像即可,不需要安装。然后,再添加一些运行必要的依赖即可,这些都可以在进行中完成。
这些便捷的镜像,是通过Dockerfile来定义的。

Define a container with Dockerfile

使用Dockerfile来定义一个容器。Dockerfile定义了容器内的环境。在这种环境中,对网络接口和磁盘驱动器等资源的访问都是虚拟化的,这与系统其他部分是隔离的。需要自己映射到容器外部的端口,可以指定需要copy到容器的文件。不管怎样,当你定义完成之后,这个你构建的容器,无论在哪里运行,它的运行结果和行为都完全和你预期的一致。

创建一个空目录,cd到该目录下,touch一个名为Dockerfile文件,复制下面的内容到Dockerfile文件中,注意要文件中,语句的注释。

1
2
3
4
5
6
7
8
9
10
11
12
13
14
15
16
17
18
19
20
# Use an official Python runtime as a parent image
FROM python:2.7-slim

# Set the working directory to /app
WORKDIR /app

# Copy the current directory contents into the container at /app
ADD . /app

# Install any needed packages specified in requirements.txt
RUN pip install --trusted-host pypi.python.org -r requirements.txt

# Make port 80 available to the world outside this container
EXPOSE 80

# Define environment variable
ENV NAME World

# Run app.py when the container launches
CMD ["python", "app.py"]

上面Dockerfile提到的文件app.py和requirements.txt还没有建立,接下来,先来创建它们

The app itself

在Dockerfile文件的同级目录下再创建两个文件,requirements.txt和app.py,这样我们这个简单的app就完成了。

requirements.txt
1
2
Flask
Redis
app.py
1
2
3
4
5
6
7
8
9
10
11
12
13
14
15
16
17
18
19
20
21
22
23
24
from flask import Flask
from redis import Redis, RedisError
import os
import socket

# Connect to Redis
redis = Redis(host="redis", db=0, socket_connect_timeout=2, socket_timeout=2)

app = Flask(__name__)

@app.route("/")
def hello():
try:
visits = redis.incr("counter")
except RedisError:
visits = "<i>cannot connect to Redis, counter disabled</i>"

html = "<h3>Hello {name}!</h3>" \
"<b>Hostname:</b> {hostname}<br/>" \
"<b>Visits:</b> {visits}"
return html.format(name=os.getenv("NAME", "world"), hostname=socket.gethostname(), visits=visits)

if __name__ == "__main__":
app.run(host='0.0.0.0', port=80)

构建Docker镜像

1
2
3
4
5
6
7
8
9
10
11
12
13
14
15
16
17
18
19
20
21
22
23
24
25
26
27
28
29
30
31
32
33
34
35
36
37
38
39
40
41
42
43
44
45
46
47
48
49
50
51
52
53
54
55
56
57
58
59
[root@VM_0_3_centos dkt]# docker build -t friendlyhello .
Sending build context to Docker daemon 4.608kB
Step 1/7 : FROM python:2.7-slim
2.7-slim: Pulling from library/python
b0568b191983: Pull complete
55a7da9473ae: Pull complete
422d2e7f1272: Pull complete
8fb86f1cff1c: Pull complete
Digest: sha256:9e24a026a55ca1d9a7284db30ed846b7190a3d7f557edf493b454bff362ed64c
Status: Downloaded newer image for python:2.7-slim
---> b16fde09c92c
Step 2/7 : WORKDIR /app
Removing intermediate container a2c0422a46fa
---> b3f84ed88338
Step 3/7 : ADD . /app
---> 74a6295086c5
Step 4/7 : RUN pip install --trusted-host pypi.python.org -r requirements.txt
---> Running in d3b6fc400e6d
Collecting Flask (from -r requirements.txt (line 1))
Downloading Flask-0.12.2-py2.py3-none-any.whl (83kB)
Collecting Redis (from -r requirements.txt (line 2))
Downloading redis-2.10.6-py2.py3-none-any.whl (64kB)
Collecting itsdangerous>=0.21 (from Flask->-r requirements.txt (line 1))
Downloading itsdangerous-0.24.tar.gz (46kB)
Collecting Jinja2>=2.4 (from Flask->-r requirements.txt (line 1))
Downloading Jinja2-2.10-py2.py3-none-any.whl (126kB)
Collecting Werkzeug>=0.7 (from Flask->-r requirements.txt (line 1))
Downloading Werkzeug-0.14.1-py2.py3-none-any.whl (322kB)
Collecting click>=2.0 (from Flask->-r requirements.txt (line 1))
Downloading click-6.7-py2.py3-none-any.whl (71kB)
Collecting MarkupSafe>=0.23 (from Jinja2>=2.4->Flask->-r requirements.txt (line 1))
Downloading MarkupSafe-1.0.tar.gz
Building wheels for collected packages: itsdangerous, MarkupSafe
Running setup.py bdist_wheel for itsdangerous: started
Running setup.py bdist_wheel for itsdangerous: finished with status 'done'
Stored in directory: /root/.cache/pip/wheels/fc/a8/66/24d655233c757e178d45dea2de22a04c6d92766abfb741129a
Running setup.py bdist_wheel for MarkupSafe: started
Running setup.py bdist_wheel for MarkupSafe: finished with status 'done'
Stored in directory: /root/.cache/pip/wheels/88/a7/30/e39a54a87bcbe25308fa3ca64e8ddc75d9b3e5afa21ee32d57
Successfully built itsdangerous MarkupSafe
Installing collected packages: itsdangerous, MarkupSafe, Jinja2, Werkzeug, click, Flask, Redis
Successfully installed Flask-0.12.2 Jinja2-2.10 MarkupSafe-1.0 Redis-2.10.6 Werkzeug-0.14.1 click-6.7 itsdangerous-0.24
Removing intermediate container d3b6fc400e6d
---> 4df35974b59f
Step 5/7 : EXPOSE 80
---> Running in d22d83548539
Removing intermediate container d22d83548539
---> 7e7c88118497
Step 6/7 : ENV NAME World
---> Running in 5a9c2cfde214
Removing intermediate container 5a9c2cfde214
---> 462234d15e1a
Step 7/7 : CMD ["python", "app.py"]
---> Running in 26ce9fb35867
Removing intermediate container 26ce9fb35867
---> 551973057533
Successfully built 551973057533
Successfully tagged friendlyhello:latest
[root@VM_0_3_centos dkt]#

查看当前镜像

1
2
3
4
[root@VM_0_3_centos dkt]# docker images
REPOSITORY TAG IMAGE ID CREATED SIZE
friendlyhello latest 551973057533 6 minutes ago 150MB
python 2.7-slim b16fde09c92c 2 weeks ago 139MB

这里和官网不同的是,使用build命令构建之后,会生成两个镜像。进过测试发现,在Dockerfile中配置几个FROM … ,构建后就会创建FROM 后面指定的镜像。

Run app

1
2
3
4
5
6
7
[root@VM_0_3_centos dkt]# docker run -p 3000:80 friendlyhello
* Running on http://0.0.0.0:80/ (Press CTRL+C to quit)

[root@VM_0_3_centos ~]# docker ps
CONTAINER ID IMAGE COMMAND CREATED STATUS PORTS NAMES
975aedd8d085 friendlyhello "python app.py" 35 seconds ago Up 35 seconds 0.0.0.0:3000->80/tcp focused_villani
[root@VM_0_3_centos ~]#

使用 run 命令启动一个镜像,可以使用 -p 命令指定容器外部的端口和内部端口的映射,上面命令指定外部端口为3000映射容器内部的80端口。

1
2
3
4
5
6
[root@VM_0_3_centos dkt]# docker run -d --name my-first-app friendlyhello
7417b8f4d62e05a2ba32dde6f9ae64b3bd5e6ae4c411cca405f3730e3f4e8be5
[root@VM_0_3_centos dkt]# docker ps
CONTAINER ID IMAGE COMMAND CREATED STATUS PORTS NAMES
7417b8f4d62e friendlyhello "python app.py" 3 seconds ago Up 2 seconds 80/tcp my-first-app
[root@VM_0_3_centos dkt]#

使用 -d 参数让容器在后台运行,使用 –name 参数后面加自定义的名字,可以为启动的容器命名。

1
2
3
[root@VM_0_3_centos dkt]# docker logs my-first-app 
* Running on http://0.0.0.0:80/ (Press CTRL+C to quit)
[root@VM_0_3_centos dkt]#

使用 docker logs 后面加容器名,可以打印出容器的日志信息。

Share your image

分享镜像。如果是首次登陆的话,需要到官网去注册一个账户。

Login
1
2
3
4
5
6
[root@VM_0_3_centos dkt2]# docker login
Login with your Docker ID to push and pull images from Docker Hub. If you don't have a Docker ID, head over to https://hub.docker.com to create one.
Username: xiaobinzhang
Password:
Login Succeeded
[root@VM_0_3_centos dkt2]#
Tag the image

本地机器上的镜像和远程服务器上的镜像之间的映射关系是:username/repository:tag。tag是可选的,但是强烈建议为每个版本的镜像打一个不同的版本标签。

1
2
3
4
5
6
7
8
9
[root@VM_0_3_centos ~]# docker tag --help

Usage: docker tag SOURCE_IMAGE[:TAG] TARGET_IMAGE[:TAG]

Create a tag TARGET_IMAGE that refers to SOURCE_IMAGE

Options:

[root@VM_0_3_centos ~]#

下面就使用tag创建一个镜像,并给该进行指定版本

1
2
3
4
5
6
7
8
9
10
11
12
13
14
15
[root@VM_0_3_centos ~]# docker images
REPOSITORY TAG IMAGE ID CREATED SIZE
friendlyhello latest 551973057533 22 hours ago 150MB
centos latest e934aafc2206 4 days ago 199MB
redis latest c5355f8853e4 2 weeks ago 107MB
python 2.7-slim b16fde09c92c 2 weeks ago 139MB
[root@VM_0_3_centos ~]# docker tag redis:latest xiaobinzhang/redis:0.0.1
[root@VM_0_3_centos ~]# docker images
REPOSITORY TAG IMAGE ID CREATED SIZE
friendlyhello latest 551973057533 22 hours ago 150MB
centos latest e934aafc2206 4 days ago 199MB
redis latest c5355f8853e4 2 weeks ago 107MB
xiaobinzhang/redis 0.0.1 c5355f8853e4 2 weeks ago 107MB
python 2.7-slim b16fde09c92c 2 weeks ago 139MB
[root@VM_0_3_centos ~]#

上面基于本地当前的redis镜像,重新制作了一个tag为0.0.1,镜像名为xiaobinzhang/redis的镜像。

NOTE :官方文档上的命令是 docker tag image username/repository:tag 但是,我自己在本机操作后,发现这样不可。

1
2
3
4
5
6
7
8
[root@VM_0_3_centos ~]# docker tag image centos xiaobinzhang/centos:0.0.1
"docker tag" requires exactly 2 arguments.
See 'docker tag --help'.

Usage: docker tag SOURCE_IMAGE[:TAG] TARGET_IMAGE[:TAG]

Create a tag TARGET_IMAGE that refers to SOURCE_IMAGE
[root@VM_0_3_centos ~]#

Publish the image

推送镜像。上传刚刚标记过的镜像到自己的仓库。

1
2
3
4
5
6
7
8
9
[root@VM_0_3_centos ~]# docker push xiaobinzhang/redis:0.0.1
The push refers to repository [docker.io/xiaobinzhang/redis]
dc532c93e196: Mounted from library/redis
4809734bf3c3: Mounted from library/redis
e7c4433350f1: Mounted from library/redis
b92d098685e5: Mounted from library/redis
27af3b14aa14: Mounted from library/redis
43efe85a991c: Mounted from library/redis
0.0.1: digest: sha256:1415c3ce635e1bb7e9d672c476f70fa9ddbe720f01d419babcdd2235103f7a85 size: 1571

上传成功后,登录https://hub.docker.com 到自己的账户下,可以看到刚刚上传成功的镜像。如果你设置的自己的仓库为公共的,那么,你上传的进项,可以被所有人使用。

Pull and run the image from the remote repository

从远程仓库下载镜像。

首先删除本地镜像,使用 rmi 删除镜像,使用 rm 删除容器。

1
[root@VM_0_3_centos ~]# docker rmi xiaobinzhang/redis:0.0.1

然后下载运行远程的镜像

1
2
3
4
[root@VM_0_3_centos ~]# docker run xiaobinzhang/redis:0.0.1
Unable to find image 'xiaobinzhang/redis:0.0.1' locally
docker: Error response from daemon: pull access denied for xiaobinzhang/redis, repository does not exist or may require 'docker login'.
See 'docker run --help'.

出现上面这种情况的原因是,我把刚上传的这个仓库设置成为了private的,所以下载失败。登入hub.docker手动置为public,再次执行。

1
2
3
4
5
6
7
8
9
10
11
12
13
14
15
16
17
18
19
20
[root@VM_0_3_centos ~]# docker run xiaobinzhang/redis:0.0.1
Unable to find image 'xiaobinzhang/redis:0.0.1' locally
0.0.1: Pulling from xiaobinzhang/redis
Digest: sha256:1415c3ce635e1bb7e9d672c476f70fa9ddbe720f01d419babcdd2235103f7a85
Status: Downloaded newer image for xiaobinzhang/redis:0.0.1
1:C 11 Apr 08:10:48.377 # oO0OoO0OoO0Oo Redis is starting oO0OoO0OoO0Oo
1:C 11 Apr 08:10:48.377 # Redis version=4.0.9, bits=64, commit=00000000, modified=0, pid=1, just started
1:C 11 Apr 08:10:48.377 # Warning: no config file specified, using the default config. In order to specify a config file use redis-server /path/to/redis.conf
1:M 11 Apr 08:10:48.379 * Running mode=standalone, port=6379.
1:M 11 Apr 08:10:48.379 # WARNING: The TCP backlog setting of 511 cannot be enforced because /proc/sys/net/core/somaxconn is set to the lower value of 128.
1:M 11 Apr 08:10:48.379 # Server initialized
1:M 11 Apr 08:10:48.379 # WARNING overcommit_memory is set to 0! Background save may fail under low memory condition. To fix this issue add 'vm.overcommit_memory = 1' to /etc/sysctl.conf and then reboot or run the command 'sysctl vm.overcommit_memory=1' for this to take effect.
1:M 11 Apr 08:10:48.379 # WARNING you have Transparent Huge Pages (THP) support enabled in your kernel. This will create latency and memory usage issues with Redis. To fix this issue run the command 'echo never > /sys/kernel/mm/transparent_hugepage/enabled' as root, and add it to your /etc/rc.local in order to retain the setting after a reboot. Redis must be restarted after THP is disabled.
1:M 11 Apr 08:10:48.379 * Ready to accept connections
^C1:signal-handler (1523434363) Received SIGINT scheduling shutdown...
1:M 11 Apr 08:12:43.744 # User requested shutdown...
1:M 11 Apr 08:12:43.744 * Saving the final RDB snapshot before exiting.
1:M 11 Apr 08:12:43.753 * DB saved on disk
1:M 11 Apr 08:12:43.754 # Redis is now ready to exit, bye bye...
[root@VM_0_3_centos ~]#

执行成功,其实可以使用 docker pull xiaobinzhang/redis:0.0.1 的方式,拉去远程仓库的镜像。只要将应用,包括该应用运行时需要的一切依赖、环境、源码等等制作为一个镜像,那么无论在什么地方,只要docker可以启动,并且能够拉去你上传的镜像,这个镜像不需要其他的配置和安装,就可以运行起来。

Conclusion containers

到现在为止,已经掌握了docker的基本操作命令。在简单的使用中,已经完全足够了。

  • 查看镜像列表
  • 查看运行时容器
  • 查看全部容器
  • 运行容器,并指定后台运行,指定容器别名,映射端口
  • 删除容器,删除镜像
  • Dockerfile的组成和关键字
  • 从Dockerfile构建一个镜像
  • 为镜像打版本标签
  • 推送本地镜像到远程仓库
  • 从远程仓库拉取镜像到本地

接下来将要学习,如何通过在服务中运行容器来扩展我们的引用。

Services

官方链接:https://docs.docker.com/get-started/part3/

在分布式应用中,我们把不同的模块称之为服务。在Docker中,我们可以把一个容器称之为一个服务。那么问题就来了,既然是服务,我们就要考虑一个服务需要满足的一些要求,比如它对外暴露的端口,编码,以及负载均衡,等等。
幸运的是,在docker中定义这些是非常的容易的。在Docker平台,定义、运行、弹性扩展等操作,只需要编辑 docker-compose.yml文件即可。

docker-compose.yml

touch一个名为docker-compose.yml的文件,复制以下信息到文件中。

1
2
3
4
5
6
7
8
9
10
11
12
13
14
15
16
17
18
19
version: "3"
services:
web:
# replace username/repo:tag with your name and image details
image: username/repo:tag
deploy:
replicas: 5
resources:
limits:
cpus: "0.1"
memory: 50M
restart_policy:
condition: on-failure
ports:
- "80:80"
networks:
- webnet
networks:
webnet:

这个docker-compose.yml文件告诉Docker需要完成以下几件事情

  • 从远程仓库拉去镜像
  • 启动5个镜像的实例,限制每个实例最多使用10%的CPU和50M的内存
  • 当着6个实例只要有一个失败时立即重启一个代替
  • 映射端口80:80
  • 从服务80端口对服务内部实例做负载均衡
  • 设置默认的负载均衡网络

NOTE :yml文件的缩进格式不要写错,否则会在执行下面指令的时候,会报错。

Run your new load-balanced app

运行一个新的负载均衡应用。

首先执行下面这条命令

1
[root@VM_0_3_centos dkt2]# docker swarm init

NOTE : 在稍后的章节在解释docker swarm init这个命令的含义。但是此时如果不先执行这条语句的话,会抛一个错误“this node is not a swarm manager”。

现在,来运行这个应用,此时我们只有一个docker-compose.yml文件,并且执行了一个docker swarm init命令。下面我们在给这个应用起一个名字:getstartedlab

1
2
3
[root@VM_0_3_centos dkt3]# docker stack deploy -c docker-compose.yml getstartedlab
Creating network getstartedlab_webnet
Creating service getstartedlab_web

执行完成后,如果我们的这个镜像是被部署在一台主机上的话,那么此时这个一个单独的服务栈运行了5个容器实例。接下来我们来验证一下。

1
2
3
[root@VM_0_3_centos dkt3]# docker service ls
ID NAME MODE REPLICAS IMAGE PORTS
dlo3u47w91el getstartedlab_web replicated 5/5 xiaobinzhang/friendlyhello:0.0.1 *:80->80/tcp

现在可以看到,机器中有一个以刚刚我们给命名为前缀的web服务:getstartedlab_web,并且可以看到这个服务的ID、复制的数量、镜像名和对外的端口。

一个单独运行的容器实例被称为task。每一个task都有一个唯一的ID,按照docker-compose.yml文件中配置的replicas个数,而启动几个task。用下面命令来列出这个服务的全部task列表。

1
2
3
4
5
6
7
8
[root@VM_0_3_centos dkt2]# docker service ps getstartedlab_web 
ID NAME IMAGE NODE DESIRED STATE CURRENT STATE ERROR PORTS
eevy540v8ni6 getstartedlab_web.1 xiaobinzhang/friendlyhello:0.0.1 VM_0_3_centos Running Running 21 minutes ago
29k0z7sjhams getstartedlab_web.2 xiaobinzhang/friendlyhello:0.0.1 VM_0_3_centos Running Running 21 minutes ago
2h7ttm705fll getstartedlab_web.3 xiaobinzhang/friendlyhello:0.0.1 VM_0_3_centos Running Running 21 minutes ago
pszqwmkjffdp getstartedlab_web.4 xiaobinzhang/friendlyhello:0.0.1 VM_0_3_centos Running Running 21 minutes ago
swiw8plaoof0 getstartedlab_web.5 xiaobinzhang/friendlyhello:0.0.1 VM_0_3_centos Running Running 21 minutes ago
[root@VM_0_3_centos dkt2]#

现在执行以下curl -4 http://localhost来看一下负载均衡的效果。

1
2
3
4
5
6
7
8
9
10
11
[root@VM_0_3_centos ~]# curl -4 http://localhost
<h3>Hello World!</h3><b>Hostname:</b> 54ef1e81d62d<br/><b>Visits:</b> <i>cannot connect to Redis, counter disabled</i>[root@VM_0_3_centos ~]#
[root@VM_0_3_centos ~]# curl -4 http://localhost
<h3>Hello World!</h3><b>Hostname:</b> 04b047c14f53<br/><b>Visits:</b> <i>cannot connect to Redis, counter disabled</i>[root@VM_0_3_centos ~]#
[root@VM_0_3_centos ~]# curl -4 http://localhost
<h3>Hello World!</h3><b>Hostname:</b> abb6fb33581b<br/><b>Visits:</b> <i>cannot connect to Redis, counter disabled</i>[root@VM_0_3_centos ~]#
[root@VM_0_3_centos ~]# curl -4 http://localhost
<h3>Hello World!</h3><b>Hostname:</b> 446c7e5fcff2<br/><b>Visits:</b> <i>cannot connect to Redis, counter disabled</i>[root@VM_0_3_centos ~]#
[root@VM_0_3_centos ~]# curl -4 http://localhost
<h3>Hello World!</h3><b>Hostname:</b> 09591611aae3<br/><b>Visits:</b> <i>cannot connect to Redis, counter disabled</i>[root@VM_0_3_centos ~]#
[root@VM_0_3_centos ~]#
1
2
3
4
5
6
[root@VM_0_3_centos ~]# docker container ls -q
abb6fb33581b
54ef1e81d62d
446c7e5fcff2
04b047c14f53
09591611aae3

可以看到,每次访问结果返回的Hostname都不一样,并且Hostname都在这个web服务的ID列表中。

Scale the app

弹性扩展应用。可以通过修改docker-compose.yml文件中replicas的值来对该服务进行弹性扩容。修改之后,运行docker stack deploy命令即可生效。

现在修改replicas的值由5改为4。并且重新部署。

1
2
[root@VM_0_3_centos dkt3]# docker stack deploy -c docker-compose.yml  getstartedlab
Updating service getstartedlab_web (id: dlo3u47w91el1r259c2tt2fp1)

几秒钟后,检查一下

1
2
3
4
5
6
7
8
9
10
[root@VM_0_3_centos ~]# docker service ls
ID NAME MODE REPLICAS IMAGE PORTS
dlo3u47w91el getstartedlab_web replicated 4/4 xiaobinzhang/friendlyhello:0.0.1 *:80->80/tcp
[root@VM_0_3_centos ~]# docker service ps getstartedlab_web
ID NAME IMAGE NODE DESIRED STATE CURRENT STATE ERROR PORTS
eevy540v8ni6 getstartedlab_web.1 xiaobinzhang/friendlyhello:0.0.1 VM_0_3_centos Running Running 34 minutes ago
29k0z7sjhams getstartedlab_web.2 xiaobinzhang/friendlyhello:0.0.1 VM_0_3_centos Running Running 34 minutes ago
2h7ttm705fll getstartedlab_web.3 xiaobinzhang/friendlyhello:0.0.1 VM_0_3_centos Running Running 34 minutes ago
pszqwmkjffdp getstartedlab_web.4 xiaobinzhang/friendlyhello:0.0.1 VM_0_3_centos Running Running 34 minutes ago
[root@VM_0_3_centos ~]#

现在可以看到,机器中的service的REPLICAS信息已经发生了变化。并且运行中的容器实例也由之前的5个变为了4个。Docker平台可以就地更新,不需要杀死一些进程或容器。

Take down the app and the swarm

卸载应用集群。

使用docker stack rm卸载应用

1
2
3
[root@VM_0_3_centos dkt3]# docker stack rm getstartedlab 
Removing service getstartedlab_web
Removing network getstartedlab_webnet
1
2
[root@VM_0_3_centos ~]# docker service ls
ID NAME MODE REPLICAS IMAGE PORTS

现在已近卸载了getstartedlab应用

再卸载swarm,swarm内容在今后的章节中介绍。

1
2
[root@VM_0_3_centos dkt3]# docker swarm leave --force
Node left the swarm.

Conclusion services

到目前为止,已近掌握了服务的概念,通过services的学习,掌握了以下结果知识点:

  • docker-compose.yml的配置
  • 通过修改配置文件达到服务的弹性扩展
  • 从docker-compose.yml启动服务的步骤
  • Docker平台就地更新的特性
  • 服务的卸载和swarm的卸载

现在已近在容器学习中迈出了巨大的一步,在接下来,将学习在一个Docker集群中,怎样把我们的应用以真正的集群的方式运行。

Swarms

集群。接下来将继续学习在集群上部署我们的应用,在多台机器上运行。

Stacks

栈。

Deploy your app

部署应用。

总结

总结。

如果您愿意,可以在这里对博主打赏